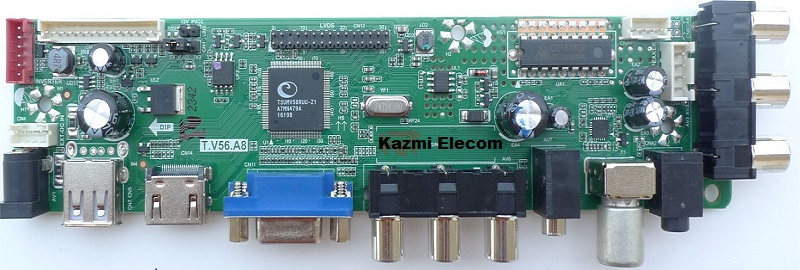
T.V56.A8 HD LCD Universal Driver Board
T.V56.A8 HD LCD Universal Driver Board Dual Video Support USB Playback TV Board For V59.A81. It supports multi-OSD languages. This universal LCD control board supports a lot of panels. Max supports Full HD LCD TV main board 1920X1080 resolution TFT-LCD 14″ to 32 ” screen.
It can Dynamically adjust the picture’s color, contrast ratio, definition, and so on. It automatically detects input video format. T.V56.A8 firmware files are given below for the technicians’ support.

Basic Info:
Model No. T.V56.A8
Main Chipset: TSUMV56RUU-Z1
Tuner: R842
Display Format: up to 1920×1080
Aspect Ratio: 4:3, 16:9 & 16:10
General Specifications:
TV System: PAL/NTSC
Panel Interface: Single channel or Dual channel LVDS
Key Button Functions: CH-/CH+/MENU/VOL-/VOL+Source/Power
Multi-Language OSD: Yes
Mirror Option: Yes
Backlight Adjust: Yes
Input/Output Ports: HDMI, VGA, AV, USB, RF TV interface and Earphone Out
Audio O/P Power: 2 x 3 Watt (8 ohm)
Panel Voltage: +3.3V/+5V/+12V
USB Port: Yes (Firmware Upgrade and Multimedia Playback Support)
USB File Format: Audio (Mp3, wma, m4a/aac), Video (avi, mp4, ts/trp, mkv/mov, mpg, dat, vob, rm/rmvb), Picture (Jpg, jpeg, bmp, png), Text (text)
IR Control: Yes (Controllable by Remote Control)
Electrical Parameters:
Working Input Voltage: DC +12 Volt
Maximum Current: 2000mA (Without Panel)
Standby Power: <0.2W (for the motherboard only)
Maximum Current for USB: 500mA

How to Upgrade Firmware:
- Empty the USB disk or Format in FAT32
- Copy the required resolution file (*. Bin file) with the TXT file to the USB disk
- Connect the USB disk to the mainboard
- Connect the Keyboard and TV Mainboard
- Connect the power supply, and check the keyboard light. If there is a flashing light,
that is in the written program, waiting for the light to turn to Green, work is done.
Note: If there is no flashing light, please cut off the power supply, then connect the USB disk once
again, then connect the power supply again, and if the power supply can’t be cut off *The same firmware can only be burned once a time
Factory Service Mode:
Menu+1147
Boot Logo Setting:
- Copy your logo into the USB disk
- Connect the USB disk to the mainboard
- Find your logo in Multi-media File
- Select your logo
- Press No.”6 ” on the remote control to change to fullscreen play, then press “ok” on
the remote control, on the bottom of the option items, there is a ” catch”, choose it.
Note: The following firmware collection is a USB bootable and a backup Dump saved from working LED TVs that can be loaded by a programmer. Kazmi Elecom Team is not responsible for any type of damage/loss as a result of uploading/downloading the firmware. If you are new and do not have enough knowledge of loading or installing software/firmware or dump files then read here first.
How to Download T.V56.A8 Firmware File:
Download your required file of the following firmware and then extract it you will get the folder. Now you can write the file with a programming tool. For more Details about the download, process watch the video Click Here
T.V56.A8 Firmware All resolutions Free Download Here :
| S.NO. | BOARD/DESCRIPTION | DOWNLOAD LINK |
|---|---|---|
| 1 | T.V56.A8_1024x768_General_USB | Download |
| 2 | T.V56.A8_1366x768_General_USB | Download |
| 3 | T.V56.A8_1440x900_General_USB | Download |
| 4 | T.V56.A8_1600x900_General_USB | Download |
| 5 | T.V56.A8_1920x1080_General_USB | Download |
| 6 | T.V56.A8_1920x1200_General_USB | Download |
| 7 | T.V56.A8_1024x768_Panel_USB | Download |
| 8 | T.V56.A8_1200x800_Panel_USB | Download |
| 9 | T.V56.A8_1280x720_Panel_USB | Download |
| 10 | T.V56.A8_1280x768_Panel_USB | Download |
| 11 | T.V56.A8_1280x1024_Panel_USB | Download |
| 12 | T.V56.A8_1366x768_Panel_USB | Download |
| 13 | T.V56.A8_1400x1050_Panel_USB | Download |
| 14 | T.V56.A8_1600x900_Panel_USB | Download |
| 15 | T.V56.A8_1600x1200_Panel_USB | Download |
| 16 | T.V56.A8_1680x1050_Panel_USB | Download |
Unfortunately, Launcher has Stopped. Smart Android LED TV Software Issue
